
Decoding QR Codes for fun and profit
QR code decoders
If you’ve ever wanted to write your own QR code decoder, there’s some excellent resources out there. Unfortunately, many of them miss out crucial information for larger QR codes. This tutorial goes into the details of decoding, and the pitfalls you might encounter.
Briefly, the decoding process looks like this:
- Read the modules containing
format bitsto find theerror correction levelandmask pattern - Read and unmask data modules as bits of
data codewords - Deinterleave the
data codewords - Read the
encoding bitsanddata length - Read the total message data and decode it as specified
There’s a lot more involved on the error correction and image processing side, but I won’t be going over those in this guide.
Anatomy of a QR Code
Before we start decoding, first you must understand the different parts of a QR code.
Modules
- Black and white boxes that make up the QR code
- Called modules to separate them from pixels
- On or 1 when it is black, Off or 0 when it is white
Version
- Each size of QR codes is a specific version, from 1 to 40
version = ((size - 21) / 4) + 1(size being total width or height in modules)
Functional modules
Functional modules are patterns in specific locations used for metadata or image processing purposes.
Finder pattern
- Three distinct boxes in each corner except for the bottom-left.
- 7x7 module outer box, 3x3 module box inside
- The 3x3 inner box has a 1 module white border around it
- Always have a 1 module white border around the two sides facing inwards
Timing pattern
- Two 1 module wide lines, alternating on/off
- Horizontal and vertical
- Aligned to the bottom-left corner of the top-left finder pattern
Alignment pattern
- These are smaller boxes spread evenly across the QR code
- 5x5 modules boxes with 1 module in the center
- Not present on the smallest QR code (
version == 1) - The positions are dependent on QR version
- They are always in sync with the timing pattern
Format bits
- A 15 bit string containing QR code format metadata
- Two copies exist in all QR codes:
- Wrapped around the top-left finder pattern
- Below the top-right finder pattern, and right of the bottom-left finder pattern
Dark Module
- A single module that’s always on (dark)
- Always in the same place - aligned to the top-right corner of the bottom-left finder pattern
Version bits
- 18 bits defining the QR version
- Two copies:
- 6x3 rectangle above the bottom-left finder pattern
- 3x6 rectangle to the left of the top-right finder pattern
- Not present on smaller QR codes (
version < 6) - 6 bit version number with 12 bits for error correction
- Mostly useful for image-based readers to prevent false positive reads
Tip: Hover over the text, I’m interactive!
(The dark module is a bit hard to see, it’s next to the top-right corner of the bottom-left finder pattern)
Codewords? Yeah, I program
There’s some confusing terminology if you’re not used to it. To make sure we’re all on the same page, here’s a brief glossary:
- Codeword: A term used in data transmission and error correction. It is some data that is being used in a code system (code as in encoding, not programming code), e.g. reed-solomon error correction.
- Data codeword: A chunk of encoded data, usually part of some larger message
- Error correction codeword: A chunk of data used to detect and/or correct errors. Generated from data codewords.
- Block: An array of codewords. Has a fixed size depending on the group.
- Group: An array of blocks. Has a fixed number of blocks, and and all blocks in the same group have the same size.
- Provides a strict two-tier hierarchy (group -> block -> codeword)
Text manipulation
For no particular reason let’s assume you have a QR code in the following format:
const qrText = `
█▀▀▀▀▀█ █▀   ███▀ █▄█▀▀▀▄▄▀ ▄▀█▄ ▄▄▄  ▄▄█ █▀▀▀▀▀█
█ ███ █ ▀█▄▄▄  ▄█ ▄▄██▄█▄▄▀▀▄█  ▄▀▀▄▄▄ █▀ █ ███ █
█ ▀▀▀ █ ▄█▄   ▀█▄█ ▀ ██▀▀▀█▄▀▄ ▀ ▄▄ ▀▀▄   █ ▀▀▀ █
▀▀▀▀▀▀▀ █ █ ▀ ▀▄▀ █▄▀ █ ▀ █▄▀ █ █▄▀ █ █▄▀ ▀▀▀▀▀▀▀
  ▀▀█▄▀▄█▀█   ▄██▄ ▀▄ ▀█▀▀█ ▄█▄█▀▀▀▀  ▀█▀███ ▄▀▀▀
▄▄█ ▄▄▀▀▄▀ ██▄██▄ ▄▀██  ▄▀▀█▀ ▄▄█▀█▀▄ ██▀▀▄▀▄█▀▀▀
█▀▄▄  ▀  ▀▄ ▀█▀ ▄ █ ▀  ▄█▀▄█▄ ▀▀▀▀█▄█▄ █▀▄▄ ▄▄▀▀
▀  ██▀▀█ █▀ ▀ █  ▄ ▄█▄▀██▄▀ ▀█ ▀▄█ ▀  ▀██▄ ▄▄▄ █▀
  ▀█ ▀▀ ▀  ▀ ▄ █▀▄ ▀▄▀▀ ▄▄   ▄▄ ▄▄  █▀ ▀▄▄ █ ▄▄ ▀
██ ▀█▄▀█▀█ ▄▄▀▄ ▀█▀▀▀ ▀▀▄█▀▄ ▄█ ▄  ▀ ▀ ▀█▄█▀▄▄▀ ▀
█▀██ ▀▀▄█▄ █▀▀█▄▀▀ ▀▄▄█▄█▄▄ ▀ ▀    █▀▄▀▄▀ ██ ▀█▄▀
█ ▀▀█▀▀▀█▄▀▄▀ ▀█ ▄█▀▀▄█▀▀▀█  ▄ ▀▀▀█  ▀▀▀█▀▀▀██ ██
 ▀█▄█ ▀ █▄██▀▄██▄ ▀   █ ▀ █▀▀▀▀▀█ ▀▀▀ ▀ █ ▀ █▀▀ █
 █ ██▀▀▀█▄▄▀▀▀█▄▄▀▄██▄▀████ █▄ █▀ █▄▀▀▀ ▀▀▀▀█  ▀
▄█   █▀█ ▀█ ██▀█ ▀█▀▄▀▄  ▀ ▄▀█▄▄ ▀▀█▀█ ▀ ▄▀▀ ▀█▀
██▄ ▀▀▀ █  ▄▀ ▄▀  ▀▄██ ▄█▀▄▀▄  ▄ ███▄ ▀▀█▀▀▀  ▀▄▀
▀  ▄█▀▀██ ▄▀█ ▄███ █▀▄███ ▀▄ ▀▀▄ █ ▄█ ▀▀ ▀▄▄▀▄█
▄ ██ ▀▀ ██▀█▄█▀ ▄█ ▀ ▀█▄▄▀▀▀ ▄█  ▄▀▄▀ █▀█ ▀ ▀█▀█▀
 █ █▄▄▀▀ ▄▄██▄▄█  ▄ ▀▄█ ██▄█ ▀▄▀█▄ ▀▀▀ ██▄▀▄▀▀██
 █▄▄ ▀▀  █ ▄▀ ▀▀▀ ▄ ███▄▄▄▄ ▄▄ ▀█ ▄ ▀▄█▀▀ ▀▄ ▀███
▀▀▀   ▀▀▄▄▄ ▄▀▄▀ ▄█▀█ █▀▀▀█ ▄██▀▄▀█ ▀▄███▀▀▀██ ▀▀
█▀▀▀▀▀█  ▀█▄██▀█ █ ▀▄▄█ ▀ █▄▀█▀█ ▀  ▀ ▄▄█ ▀ █▀▀ ▀
█ ███ █ █▀▀▄ ▄ ▄▀ █ ██████▀ ▀███▄▀ █▀█ ▀▀▀█▀██▀▀▄
█ ▀▀▀ █ ▀██ ▄▄▀▀▄▀█ ▀▄█  ▄▄ ▀▀▀█▄▀▀ ▀ █▀ █▄  ▀▀▀█
▀▀▀▀▀▀▀   ▀▀▀▀▀▀ ▀▀ ▀▀  ▀      ▀ ▀  ▀ ▀▀   ▀  ▀▀▀`;
If you squint your eyes, it somewhat resembles a QR code. Your phone probably can’t scan it. Let’s parse that text and turn it into something more useful.
Given a coordinate [x, y], we have to get the right character from the text. While each character in a line represents one x coordinate, each line represents two modules. To get the correct row, we need to select the (y/2) line
// clean and split up the qr code text into lines for simpler access
const qrLines = qrText.trim().split("\n");

const char = qrLines[Math.floor(y / 2)][x];
Now for a detour about binary math. Stay with me, I promise it will be quick.
The text is made up of block characters, such that two modules are stacked vertically in one line of text:
const emptyBlock = " "; // colloquially "space"
const topHalf    = "▀";
const bottomHalf = "▄";
const fullBlock  = "█";
If you rotate them 90 degrees clockwise, you can think of them as a two-bit binary number

const blockMap = {
  [emptyBlock]: 0b00, // 0
  [topHalf]:    0b01, // 1
  [bottomHalf]: 0b10, // 2
  [fullBlock]:  0b11  // 3
}
With this map, we can turn each character into a number, and then we “extract” the bits we want by using some bitwise operations.
To get the numerical value we look up the character in the map (blockMap[char]).
This still gives us two possible modules. In order to figure out if we want the top or bottom module, we can use the the fact that the lowest bit is 0 when even, and 1 when odd: y & 1 produces 0 for the top, and 1 for the bottom.
Conveniently, we ordered our bit-representation such that the highest bit corresponds to the top, and the lowest bit is the bottom. We can bit-shift our numerical representation by the result of y & 1, ensuring the correct bit is always first.
blockMap[char] >> (y & 1)Last, we need to wrap the result of all of that in one final & 1. This is because in the case where y & 1 == 0, we don’t bit shift at all, and so we return the whole blockMap[char], rather than the top bit.
Putting it all together, we can make a function to get whatever bit we want from our QR code text:
const getModule = (x,y) => {
  const char = qrLines[Math.floor(y / 2)][x];

  return (blockMap[char] >> (y & 1)) & 1;
}
Honestly, I’m not sure if these two lines of code are ugly or elegant. Both I guess?
By iterating over each line twice (and with some flexbox magic), we now have a clean QR code.
Now you can scan it with your phone. But you don’t want spoilers, do you?
Decoding Pt.1: Metadata
To begin decoding we have to know the QR code version, which we can calculate from the size.
const size = QRLines[0].length; // easier to get the width than the height

const version = ((size - 21) / 4) + 1;
You can also get it from the version bits on the larger QR codes, if you want to double-check.
In our case, we have a 49x49 module QR code, which means it’s version 8.
Next we need the format metadata. It’s 15 bits long; The top 5 bits contain format data and the bottom 10 are for error correction. It’s wrapped around the top-left finder pattern, or next to the bottom-left and top-right patterns. Watch out for the timing pattern and dark module!
As we do not care about error correction we only have to read the top 5 bits, from either one. The format is then masked with these bits: 101010000010010. Unmasking is performed by XORing the masked data with the mask.
const formatBits = [];

for(let x = 0; x < 5; x++)
  formatBits.push(getModule(x, 8));

const format = parseInt(formatBits.join(""), 2) ^ 0b10101;The 5 format bits contain:
- 2 bits for error correction level
- 3 bits for the mask pattern
With some simple bitwise operations, we can get their values
const ecLevel = format >> 3;
const mask = format & 0b111;
There are 4 error correction levels, and 8 mask patterns
| Level | Binary | Decimal |
|---|---|---|
M | 00 | 0 |
L | 01 | 1 |
H | 10 | 2 |
Q | 11 | 3 |
Note that the error correction levels are not in order (from lowest to highest: L -> M -> Q -> H)
| Mask | Binary | Formula |
|---|---|---|
0 | 000 | (y + x) % 2 |
1 | 001 | y % 2 |
2 | 010 | x % 3 |
3 | 011 | (y + x) % 3 |
4 | 100 | (~~(y/2) + ~~(x/3)) % 2 |
5 | 101 | ((y*x) % 2 + (y*x) % 3) |
6 | 110 | ((y*x) % 2 + (y*x) % 3) % 2 |
7 | 111 | ((y+x) % 2 + (y*x) % 3) % 2 |
(NB: ~~ is equivalent to Math.floor() here)
In our QR code the top 5 format bits are 00111. After unmasking, that’s 10010, meaning our error correction is 10 (2 or H) and the mask pattern is 010 (also 2 or x % 3).
The mask pattern is a 2D mask applied to the data and error correction codewords before they get placed in the QR code. Mask patterns are expressed as formulas that take in the position of the module and produce cool patterns to further break up the QR code.
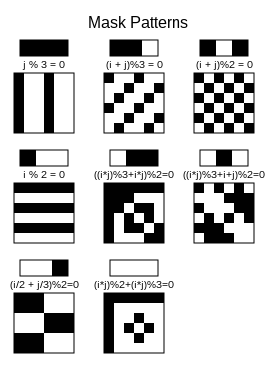
(Yoinked from the QR code wikipedia page. Note that i and j are used instead of x and y, and some of the equations are simplified)
While we’re not implementing error correction in this guide, the error correction level will be necessary for deinterleaving later.
Decoding Pt.2: Reading and Unmasking
Now that we have the mask pattern, we can begin reading the data codewords in the QR code.
Encoded data is split into 8 bit chunks called codewords. The codewords are placed starting from the bottom-right corner tightly packed, snaking up and down, left to right. Immediately following the data codewords are the error correction codewords, similarly masked, interleaved, and snaked left to right.
The individual bits in each codeword is placed in a zig-zag pattern, in either upwards or downwards direction.
If you encounter functional modules, skip over them.
When you reach the top or bottom, flip the vertical reading direction and continue reading in the next two-module column.
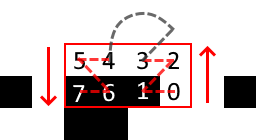
The logic for reading data bits is quite simple, despite many diagrams on the internet trying to confuse you.
- Start at the bottom-right corner and set your vertical direction to up
While you have data to read:
- Read the module at your current position
- If you are in an odd column, move one module left
- Otherwise, move one module vertically and to the right
- If you are outside the vertical bounds of the QR code:
- Flip your vertical direction
- Move one module vertically (so you’re back inside)
- Move two modules left
- If you are currently on a functional module, repeat the moving logic until you aren’t
There’s are many ways that you could implement reading; The approach I will describe is simple and intuitive, but offers room for optimization, which I encourage you to try yourself.
We will construct a mask containing all the modules that are not data,
Create a square 2D array the same size as the QR code filled with 0, and set all the locations with functional modules to 1. This simplifies reading logic as we can easily check if the module we’re on is a functional module to be skipped over.
const skipMask = Array.from({length: size}, () => new Array(size).fill(0));We have to calculate the locations with functional modules as they are different for each QR version. Luckily, most of the areas we’re interested in are grouped together and always in the same place. We don’t even need all the functional modules, as we’re mainly interested in the second half of the QR code.
// a few convenience functions
// set a rectangular region of the skip mask
const setRectangular = (startX, startY, endX, endY) => {
for(let y = startY; y < endY; y++)
for(let x = startX; x < endX; x++)
skipMask[y][x] = 1;
}
// set a square region of the skip mask
const setSquare = (startX, startY, size) =>
setRectangular(startX, startY, startX + size, startY + size);
// the coordinate of the last module inside the QR code
const end = size - 1;
// finder pattern + version block
setRectangular(end - 10, 0, size, 7);
// bottom border of qr code and format bits
setRectangular(end - 7, 7, size, 9);
// horizontal timing pattern
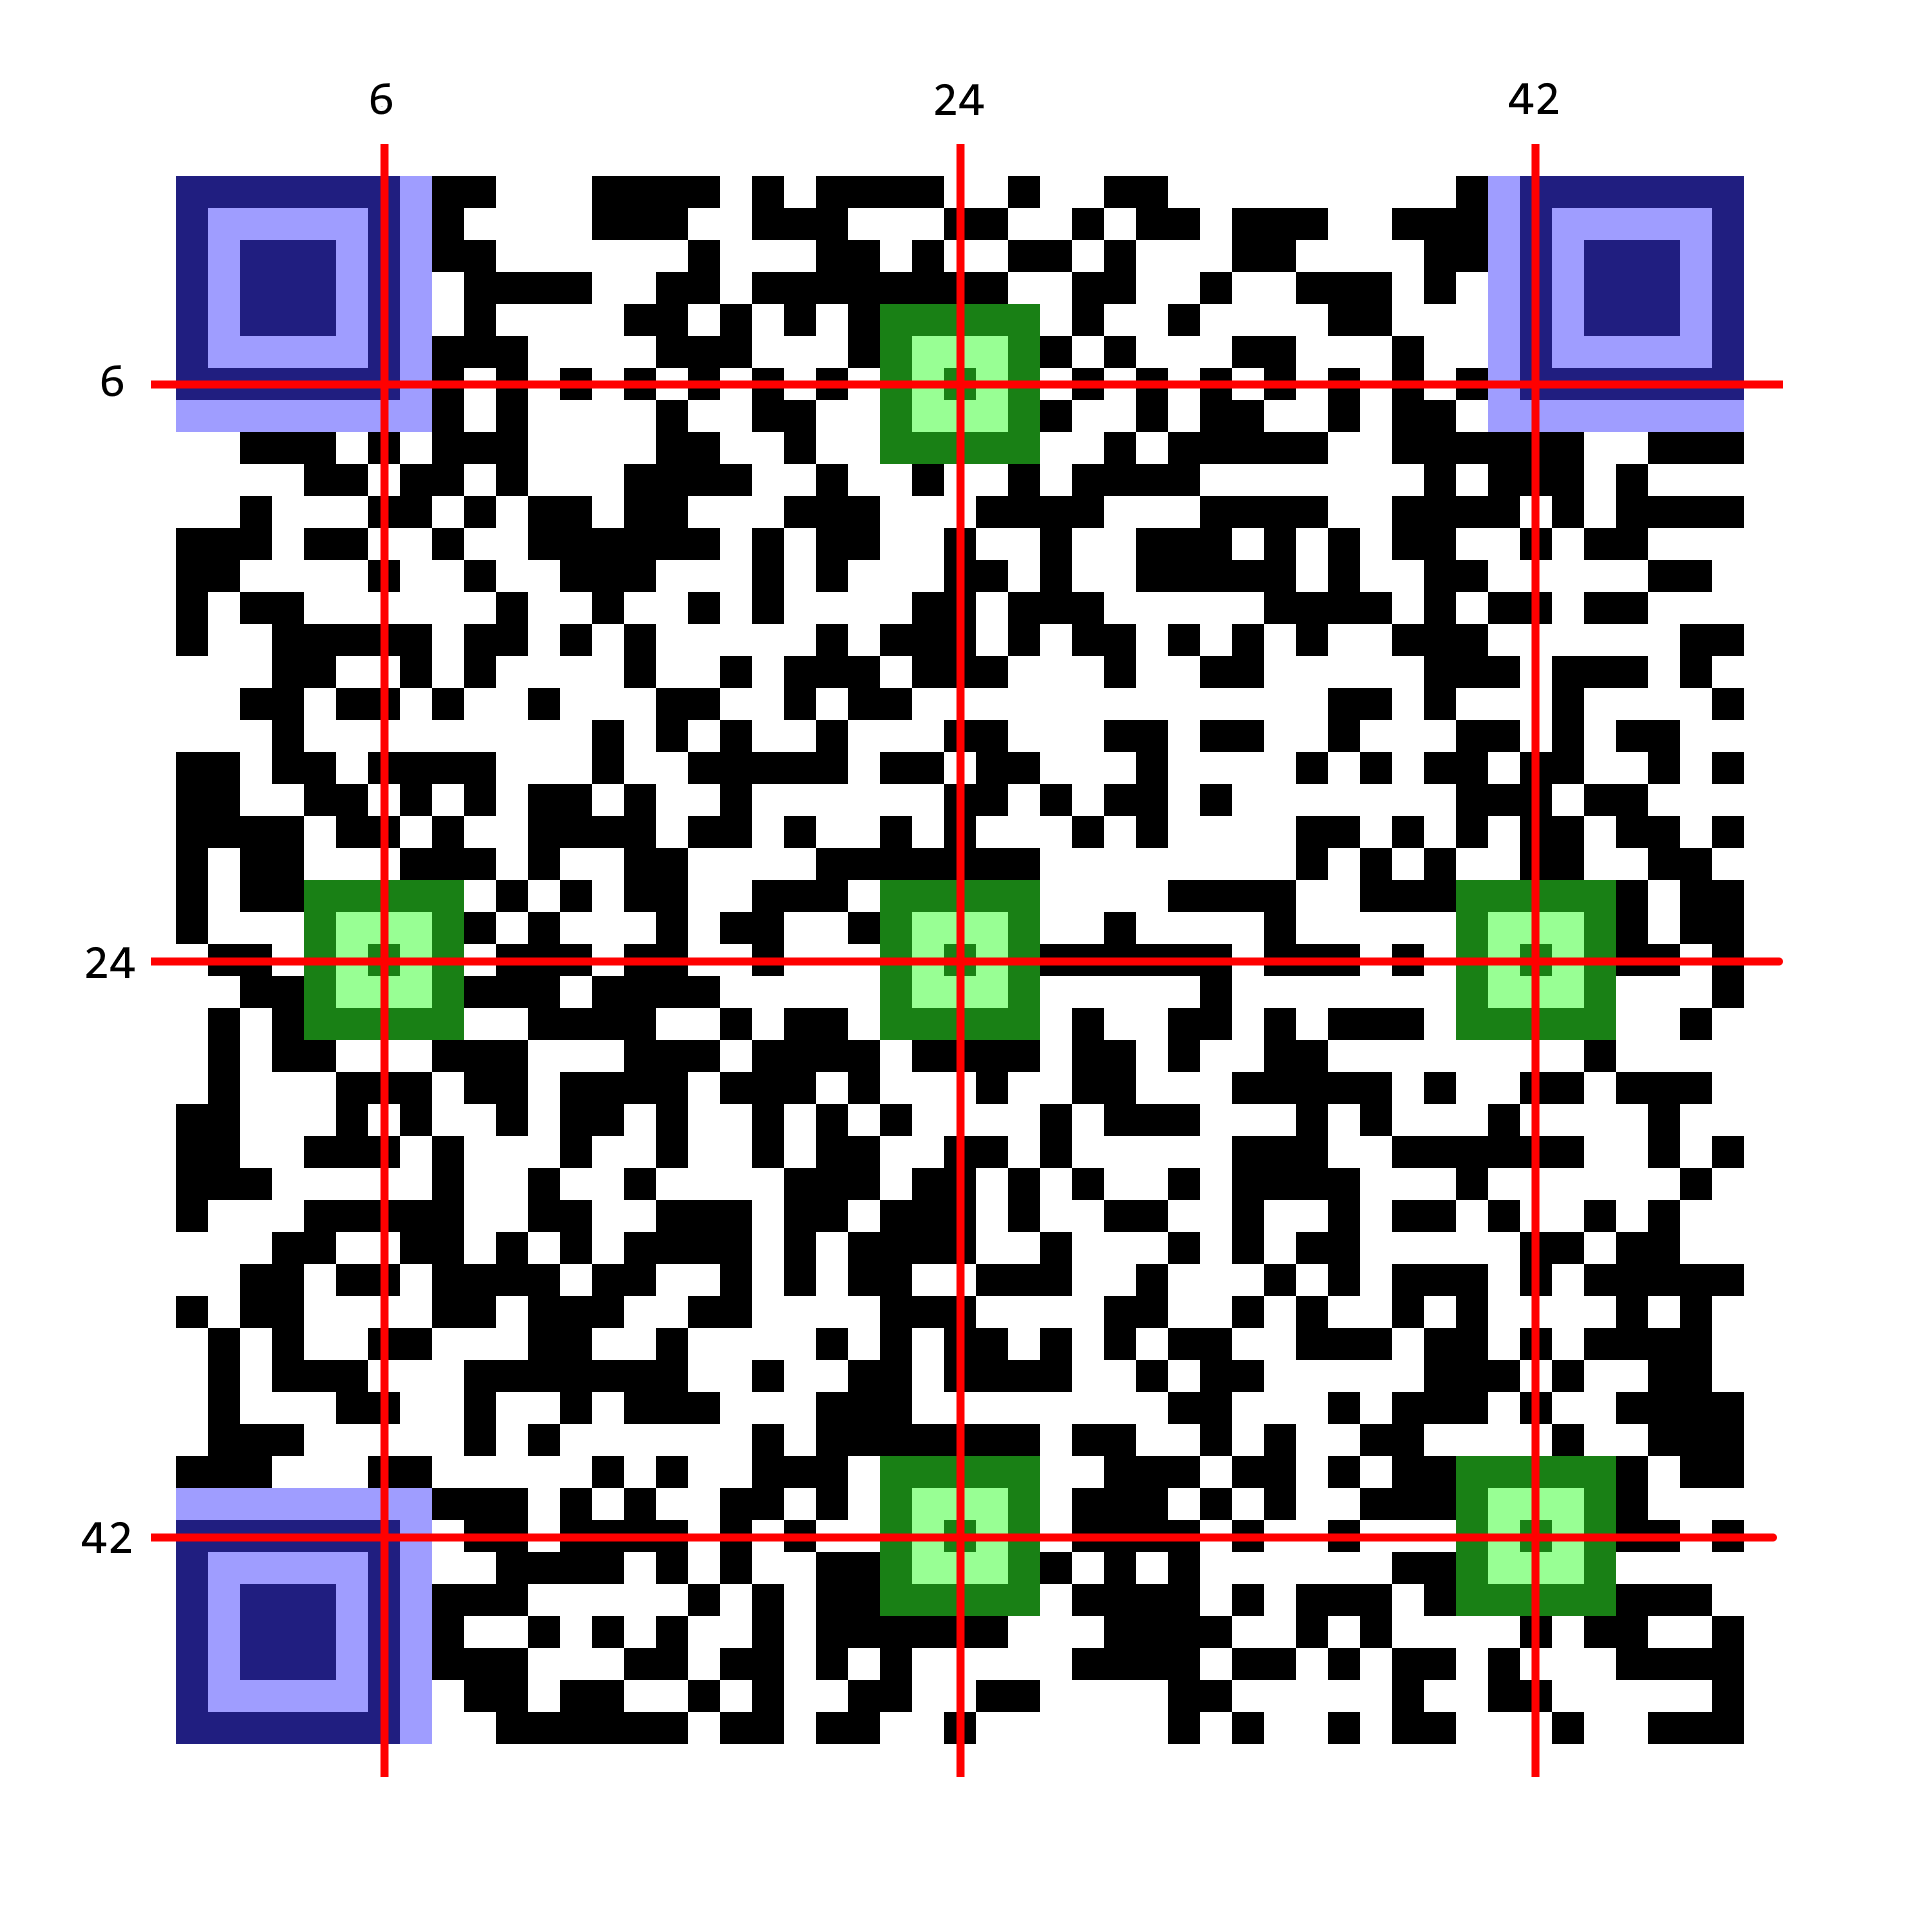
setRectangular(9, 6, end - 11, 7);Alignment patterns get a little tricky, as each QR code version has different positions. I’ve omitted most of them for brevity, you can see the full list here.
The the positions of each alignment patterns are based on a grid in sync with the timing pattern and spread equally throughout the QR code. The coordinates where each line intersects is the center of an alignment pattern, except where they overlap with finder patterns.
// an array of alignment pattern row/column positions, for each QR version
const alignmentPatterns = [
  // 7 elements not shown...
  [6, 24, 42],
  // ...
];

const patternPos = alignmentPatterns[version];

// iterate through all alignment patterns to generate all permutations
for(const x of patternPos)
  for(const y of patternPos) {
    // filter disallowed positions
    if(
      (x == 6 && y == 6) ||
      (x == 6 && y == end - 6) ||
      (x == end - 6 && y == 6)
    )
      continue;

    // the coordinates are for the center, but setSquare
    // starts from the top-left corner
    setSquare(x - 2, y - 2, 5);
  }
This will give us a rudimentary “skip mask”:
Next, we need to get the mask function using the mask pattern from the format bits earlier in Pt.1: Metadata.
const maskFunctions = [
  // ...
  (x, y) => x % 3 == 0,
  // ...
];

const maskFunction = maskFunctions[mask]
Now we can implement the module reading logic.
// start by going up
let direction = -1;
let x = end; // message bitstream starts in the bottom-right corner
let y = end;

const readBit = () => {
  // get current module and XOR with the mask
  const bit = getModule(x, y) ^ maskFormula(x, y);

  // calculate the next module position to read
  do {
    if (x & 1) { // left column
      x++; // move right & vertical
      y += direction;
    } else { // right column
      x--; // move left
    }

    // when we reach the top/bottom edge
    if(y < 0 || y == size) {
      y -= direction; // go back
      direction *= -1; // flip reading direction
      x -= 2; // jump to next column
    }

    // if we go OOB (x == -1), there's no more to read
    if(x < 0)
      break;

  } while (skipMask[y][x] == 1)

  return bit;
}
And just for good measure, a convenience function is useful too.
const readBits = n => {
  const bits = [];

  for(let i = 0; i < n; i++) {
    const bit = readBit(x, y);
    bits.push(bit);
  }

  return bits.join("");
}
Decoding Pt.3: Deinterleaving
Deinterleaving is the part many decoding tutorials skip - often using QR code version 1, where no interleaving happens.
Groups, blocks, and codewords
The total amount of data stored in each QR code version is fixed. Different error correction levels take up more space - the more error correction data, the smaller the message data. The message data and generated error correction data is split up into 8 bit chunks called codewords, each of which are placed into arrays called blocks, which are then organized into groups.
Each group has a fixed number of blocks, and all blocks inside of a group have the same number of codewords. A QR version can have 1 or more groups, and a group can have 1 or more blocks. Different groups may have different sized blocks. You can find the full list here.
With this information, we can calculate the total number of data codewords, given any version and ecLevel. All we have to do is calculate numberOfBlocks * codewordsPerBlock for every group, then sum up the result:
const codewordGroups = [
  // ...
  { // version 8
    L: { groups: [{blocks: 2,  codewords: 97}] },
    M: { groups: [{blocks: 2,  codewords: 38}, {blocks: 2,  codewords: 39}] },
    Q: { groups: [{blocks: 4,  codewords: 18}, {blocks: 2,  codewords: 19}] },
    H: { groups: [{blocks: 4,  codewords: 14}, {blocks: 2,  codewords: 15}] }
  },
  // ...
];

// the ec levels are not in order for some reason
const ecLevelToIndex = [1, 0, 3, 2]; // M, L, H, Q
const ecIndex = ecLevelToIndex[ecLevel];

const groups = codewordGroups[version][ecIndex];

const totalDataCodewords = groups.reduce(
  (sum, {blocks, codewords}) => sum + (blocks * codewords), 0
);Finally, we can read in all the data codewords by reading 8 modules at a time
const interleavedData = [];

for(let i = 0; i < totalDataCodewords; i++) {
  let bits = readBits(8);
  interleavedData.push(bits);
}
It should look like this:
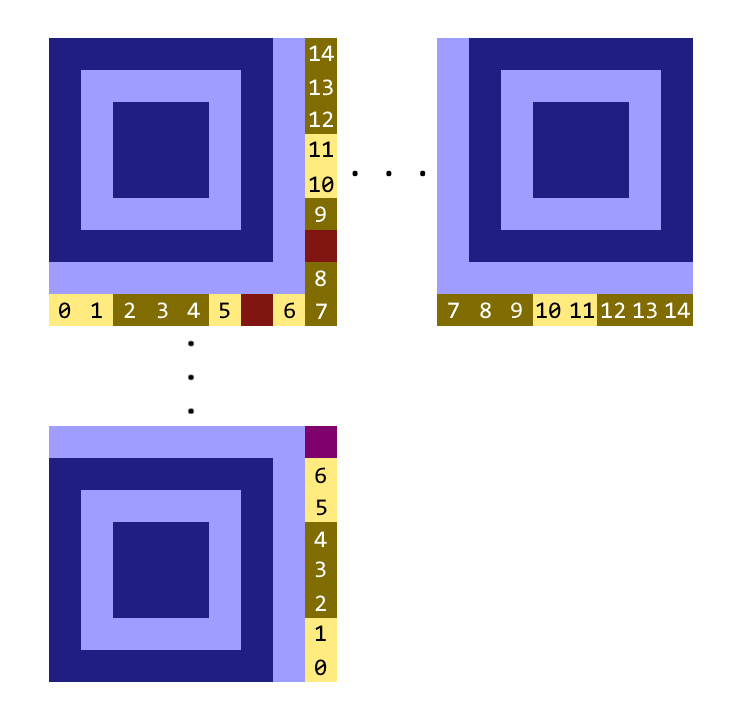
Interleaving
Interleaving is the process of splitting up the data and weaving it into itself in a sequential pattern to break it up and help with error correction.
The process for interleaving is:
- Take the first codeword
- Add it in block 0 of group 0
- Add the next one in block 1 of group 0
- Add the next one in block 2 of group 0
- …
- Once you’ve added one codeword in each block in the group 0, repeat the same in group 1
- Then group 2
- …
- Once you’ve added each codeword in each block in each group, repeat the above again until you have no more codewords left
- Take care not to overfill a block. If you’ve used up all the capacity in a block, continue on to the next block that has available space.
Here’s a worked through example, using 15 codewords (represented as hex half-bytes), put into two groups:
- Group 0:
- 3 blocks that hold 3 codewords each, and
- Group 1:
- 3 blocks that hold 2 codewords each.
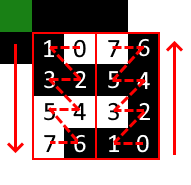
// data to interleave
[0,1,2,3,4,5,6,7,8,9,A,B,C,D,E];

[ // group 0
    [0,6,C], // block 0
    [1,7,D], // block 1
    [2,8,E]  // block 2
];

[ // group 1
    [3,9],   // block 0
    [4,A],   // block 1
    [5,B]    // block 2
];
The blocks and groups are then concatenated in order, so the final interleaved data looks like:
//  g0                   g1
//  b0     b1     b2     b0   b1   b2
  [ 0,6,C, 1,7,D, 2,8,E, 3,9, 4,A, 5,B ];
Deinterleaving is “simply” reversing this process.
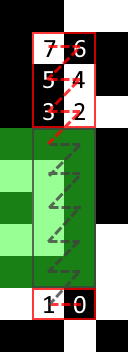
I’ll explain using the most intuitive method, which I’m calling “binning”. We will create arrays for each block in each group and iterate over the data codewords, incrementing counters for which group and block you are in. When incrementing, check if the group you are in is full - if you are, then keep incrementing the group index.
If you recall from the above section…
const codewordGroups = [
  // ...
  { // version 8
    L: { groups: [{blocks: 2,  codewords: 97}] },
    M: { groups: [{blocks: 2,  codewords: 38}, {blocks: 2,  codewords: 39}] },
    Q: { groups: [{blocks: 4,  codewords: 18}, {blocks: 2,  codewords: 19}] },
    H: { groups: [{blocks: 4,  codewords: 14}, {blocks: 2,  codewords: 15}] }
  },
  // ...
];
In our example, with a version 8 QR code and High error correction, we have two groups:
- Group 0 has
4blocks with14codewords each - Group 1 has
2block with15codewords each
This means that we have 4 * 14 + 2 * 15 = 86 data codewords in total.
Now to implement binning:
let currentGroup = 0;
let currentBlock = 0;

// create an array of arrays for each block in each group to store codewords
const dataBlocks = groups.map(({blocks}) =>
  Array.from({length: blocks}, () => [])
);

// iterate through the interleaved data
for(let i = 0; i < interleavedData.length; i++) {
  // place the current codeword into the current group and block
  const codeword = interleavedData[i];
  dataBlocks[currentGroup][currentBlock].push(codeword);

  // find the next block with available space

  do {
    if(i == interleavedData.length - 1)
      break; // if we have no more data, break to avoid an infinite loop

    currentBlock += 1;

    // if we have reached past the total number of block in this group, roll over to the next
    if(currentBlock >= groups[currentGroup].blocks) {
      currentBlock = 0;
      currentGroup += 1;

      // if we have reached the last group, roll over to the beginning
      if(currentGroup >= groups.length) {
        currentGroup = 0;
      }
    }

  // keep repeating while the current block is full
  } while(dataBlocks[currentGroup][currentBlock].length >= groups[currentGroup].codewords)
}
At the end of it, dataBlocks should look like:
- Group 0:
- Block 0:
0100010000010111101100100010011010010110010000100010001110100010001001111001011011110111100001100101011001000110 - Block 1:
1110001000100010110000100010011101010111001101100101011100100010001000111010001000100110111001101111011101000111 - Block 2:
0101011100110110010101100100001000100010110000100010011100000110000101100011011010110110100101101110011001110101 - Block 3:
1111011011100110111101110100011001010111001100100010001110100010001000100010001011000010001001101000001101100110 - Group 1:
- Block 0:
101100100010001110100010001001100010011000110110111000111000011010010010001001111101000011101100000100011110110000010001 - Block 1:
111011000001000111101100000100011110110000010001111011000001000111101100000100011110110000010001111011000001000111101100
(dataBlocks contains integer numbers, but I’m displaying them here in hexadecimal because it’s more readable)
Last but not least, we just concatenate all the groups and blocks in order to get our final bit string
const encodedData = dataBlocks.flat(3); // isn't ES6 niceFinally, we have the message data:
44 17 b2 26 96 42 23 a2 27 96 f7 86 56 46 e2 22 c2 27 57 36 57 22 23 a2 26 e6 f7 47 57 36 56 42 22 c2 27 06 16 36 b6 96 e6 75 f6 e6 f7 46 57 32 23 a2 22 22 c2 26 83 66 b2 23 a2 26 26 36 e3 86 92 27 d0 ec 11 ec 11 ec 11 ec 11 ec 11 ec 11 ec 11 ec 11 ec 11 ec
Decoding Pt.4: Decoding the data
We’re now in the final stretch. We have our raw codewords hot off the QR code and carefully deinterleaved. We just need to turn those codewords into something useful.
Luckily for us, it’s not too hard. The first 4 bits are the encoding type, and despite what you may expect there’s only 7 encoding modes:
| Type | Bits |
|---|---|
| Numeric | 0001 |
| Alphanumeric | 0010 |
| Byte | 0100 |
| Kanji | 1000 |
| ECI | 0111 |
| Structured Append | 0011 |
| FNC1 | 0101 or 1001 |
Most of these are self-explanatory:
- Numeric encodes only numbers 0-9, as groups of three numbers encoded into a sequence of 10-bit integers
- Alphanumeric is a small custom charset consisting of numbers, letters, and a few symbols
- Bytes is specifically the ISO/IEC 8859-1 charset, more commonly known as latin1, but often interpreted as UTF-8
- Kanji uses double-byte Shift-JIS
ECI, Structured Append, and FNC1 do not directly encode data, but instead signify a unique mode of operation. For example, ECI is used to signify data is encoded with a charset from the Extended Channel Information set, and Structured Append is used to chain up to 16 QR codes to form a longer message. Practically, these modes are very rare to see outside of specific or highly technical implementations.
Each mode has it’s own decoding rules, but the most popular one is “byte” mode, so we’ll focus on that. If you’re curious, you can pour over the spec for the details on all of them.
In bytes mode, the first 8 bits (16 if version > 10) immediately following the mode indicator tell us the length of the data in bytes. Again, we’ll have to perform bitwise operations because the bits we’re interested in lie in between the 8-bit codewords:
const mode = (encodedData[0] & 0b11110000) >> 4; // take the top 4 bits of the first codeword

if(mode != 0b0100)
  throw new Error("Unsupported encoding method"); // feel free to implement other modes yourself

// take the bottom 4 bits of codeword 0, shift them up so they are now the top 4 bits, and OR them to combine with the top 4 bits
const length = ((encodedData[0] & 0b1111) << 4) | ((encodedData[1] & 0b11110000) >> 4);
If you scroll up a bit and read off the first two bytes, you can see our QR code has an encoding of 4 or 0100 (bytes) and our length is 41 hex (between the 44 and 17) or 65 bytes total.
Immediately following the encoding and length is the data itself.
// decode the next length 8-bit chunks as UTF-8* characters
let message = [];
for(let i = 0; i < length; i++) {
  // combine the bottom 4 bits and top 4 bits of the next two codewords
  const topBits = (codewords[i+1] << 0xF) << 4;
  const bottomBits = (codewords[i+2] & 0xF0) >> 4;

  const char = String.fromCharCode(topBits | bottomBits);
  message.push(char);
}

message = message.join("");
(NB: Javascript strings are actually UTF-16, not UTF-8. But if you’re primarily working with latin characters, you can take advantage of the intentional overlap)
Finally, we have our big reveal, the secret message you’ve undoubtedly been dying to read:
{"id":"yoxedn","user":"notused","packing_notes":"","h6k":"bcn8i"}
Oh. Not sure what that means, really. Maybe you should keep working on solving t2?
PS: If you’ve been paying attention, you’ll notice that we only have 65 bytes, but our qr code has 86 codewords total. If you look closely, you’ll see a repeated pattern of ec and 11 at the end. This is intentional padding, used to fill up any remaining space. It’s not that interesting unless you’re worried about data integrity…